Toggle touch pad in Ubuntu

In short, the hot key Fn + F9 (or F8, whatever) to toggle enabling touch pad (track pad) does not always work due to Linux’s poor driver support (It’s the manufacturer’s fault, not Canonical’s).

I kinda came up with the following workaround.

The basic

Basically, an unsupported touch pad will be emulated as a psmouse device. The following command will disable it.

sudo modprobe -r psmouse

To enable it, run

sudo modprobe psmouse

To check if the touch pad is enabled or not, check if psmouse is listed in the result of the following command

lsmod

A little more advance

So I decided to write a bash script to toggle enabling touch pad, instead of typing different commands for that

#!/bin/bash
if [ "`lsmod | grep -o psmouse`" ];
then
    sudo modprobe -r psmouse;
else
    sudo modprobe psmouse;
fi

I put the script in ~/Programs/scripts/toggle-trackpad.sh

Now, all I have to do is to run that script whenever I want to do the toggle. That doesn’t really make my life easier. Then I came up with these ideas.

  1. Using alias

    So, I put this in the alias section of my ~/.bashrc file (I don’t use a separate ~/.bash_aliases file, since it’s not really necessary)

     alias toggle-tp="if [ \"\`lsmod | grep -o psmouse\`\" ]; then sudo modprobe -r psmouse; else sudo modprobe psmouse; fi"
    

    Ok, that looks nicer. Hummm, but then I will have to open a terminal every time I want to toggle the touch pad. Not catastrophically annoying, but I want things better.

  2. Using Alt + F2 and gksudo

    Firstly, I install gksu. modprobe requires sudo access to work. Without a shell, gksudo is required.

     sudo apt-get install gksu -y
    

    Then, I change the alias to

     alias toggle-tp="if [ \"\`lsmod | grep -o psmouse\`\" ]; then gksudo 'modprobe -r psmouse'; else gksudo 'modprobe psmouse'; fi"
    

    After re-login, I can just press Alt + F2, then type toggle-cp to toggle. That’s a bit better, but still, I just want a hot key.

  3. Custom shortcut

    So finally, I decide to edit the script in to use gksudo

     #!/bin/bash
     if [ "`lsmod | grep -o psmouse`" ];
     then
         gksudo 'modprobe -r psmouse';
     else
         gksudo 'modprobe psmouse';
     fi
    

    Then config a new keyboard shortcut (I’m using Ctrl + Super + T)

     Name: Toggle Keyboard
     Command: /path/to/toggle-trackpad.sh
    

Result

Now I can use a hot key to toggle enabling the touch pad. It’s still a little annoying that every time I want to toggle the touch pad, I would have to enter my password. Fortunately, I don’t have to do that too often. I use a mouse. It’s also a little disappointing that I can’t override the default Fn + F9 on my machine, but that’s minor. I’m happy enough.

Linux cheatsheet

This is more of a Ubuntu cheatsheet than a Linux one. However, many shortcuts and commands are usable on other Linux systems.

Most of these are just example usages. You should check each command’s manual for more options (by using the man command).

Basics

  • Read the manual of any (supported) command

      man <command>
    
  • Change the current directory

      cd <path>
    

    Go to home directory

      cd
    
  • Print the current working directory

      pwd
    
  • List files

      ls # List files in the current directory
      ls </path> # List files in a directory
      ls *.md # List files whose extention is `md`
      ls favicon* # List files that starts with `favicon`
      ls -l # List files with more information, like mod, size, owner
      ls -a # List all files, including hidden files
    

Bash shortcuts

  • Stop current command: <Ctrl> + C
  • Sleep program: <Ctrl> + Z
  • Go to start of line: <Ctrl> + A
  • Go to end of line: <Ctrl> + E
  • Cut from start of line: <Ctrl> + U
  • Cut to end of line: <Ctrl> + V
  • Select text: hold <Shift>, left click then drag your mouse
  • Copy selection: <Ctrl> + <Shift> + C
  • Paste selection: <Ctrl> + <Shift> + V
  • Search for a previously used command: <Ctrl> + R
  • Repeat last command: !!

Users and permissions

  • Check current user’s name

      whoami
    
  • Check the id of a user

      id <username>
    
  • Run a command as root

      sudo <command>
    
  • Run a command as another user

      sudo -u <username> <command>
    
  • Switch to another user

      su <username> # This requires the user's password
      sudo su <username> # Root can switch to any user without knowing the password
    
  • Add a new user

      sudo adduser <username>
    
  • Add a user into a group

      sudo usermod -aG <groupname> <username>
      sudo adduser <username> <groupname>
    
  • Delete a user

      sudo userdel <username>
    
  • Change the user’s password

      passwd
    

    Change another user’s password

      sudo passwd <username>
    
  • Change mod of a file

      sudo chmod <mod> <filepath>
    

    Variations:

      sudo chmod 600 ~/.ssh/authorized_keys
      sudo chmod +x <path> # make file at <path> executable
      sudo chmod a+x <path> # make file at <path> executable for all users
      sudo chmod -R <mod> <directory_path> # Change mod for all files under <directory>
    

    Notes: In order to cd to a directory, the directory itself must be executable to the current user

Environment variables

  • Print all environment variables

      printenv
    
  • Set an environment variables

      export VARIABLE_NAME=<value> # There should be no spaces before and after `=`
    
  • Some useful environment variables:

    • $USER: Current user’s name, same as output of whoami
    • $UID: Current user’s id, same as output of id -u $USER
    • $PWD: Path of the current working directory, same as output of pwd
    • $HOME: Current user’s home directory
    • $PATH: A set of directories where executable programs are located. These programs can be called directly without specifying the full path.

Basic programming

  • Create a variables

      VARIABLE_NAME=<value> # There should be no spaces before and after `=`
    
  • Checking a variable’s value

      echo $VARIABLE_NAME
    
  • Using variables in commands

      ls $HOME
      cd $HOME
    
  • Using the stdin output of a command as the argument of another command

      ls `pwd`
    
  • Piping the output of one command as the input of another command

      command1 .... | command2 ....
    
  • Redirecting a file or stream

      command .... >/output.log 2>error.log
      command < file.txt
    
  • Ignore error logs

      command arg1 arg2 arg3... 2>/dev/null
    
  • Ignore all logs

      command arg1 arg2 arg3... >/dev/null 2>&1
    
  • Run program in background (it’s still killed if the terminal is closed)

      command arg1 arg2 arg3... &
    

Files and folder

  • Create an empty file

      touch filename
    
  • Print content of a file

      cat </path/to/file>
    
  • Quickly create a file with a short content

      echo "<?php phpinfo(); ?>" > phpinfo.php
    
  • Appending content to file

      $ echo "1" > test
      $ echo "2" > test
      $ echo "3" >> test
      $ cat test
      2
      3
      $
    
  • Count number of words in a file

      wc </path/to/file>
    
  • Using grep to find a pattern in a file in directory

      grep <pattern> </path/to/file>
    

    Find pattern in all files in a directory recursively

      grep -r <pattern> </path/to/directory>
    

    Only show file names

      grep -rl <pattern> </path/to/directory>
    

    Search incasesensitively

      grep -i <pattern> </path/to/file>
    
  • Using find to find a file

      find </path> -type f -name '<pattern>'
    

    Or finding a directory

      find </path> -type d -name '<pattern>'
    
  • Check available diskspace

      df -ah
      du -sh
    

System

  • Show system and kernel

      uname -a
    
  • Check system disk space usage

      df -h
    
  • Show system date

      date
    
  • Show uptime

      uptime
    
  • Show current free and used memory in the system

      free -m
    
  • Set the CPU affinity of a process

      taskset 0x01 command # Set the process's CPU's afinity to CPU 1
      taskset 0x03 command # Set the process's CPU's afinity to CPU 1 and 2
      taskset 0x07 command # Set the process's CPU's afinity to CPU 1, 2 and 3
      taskset 0x15 command # Set the process's CPU's afinity to CPU 1, 2, 3 and 4
      ...
    

    01, 03, 07, and 15 are just decimal values of 0001, 0011, 0111, 1111

  • List all block devices (except RAM disks)

      lsblk
    

    This is useful to find the device path of your usb, sdcard, or hard drive. For example:

      NAME                  MAJ:MIN RM   SIZE RO TYPE MOUNTPOINT
      sda                     8:0    0 465,8G  0 disk
      ├─sda1                  8:1    0   487M  0 part /boot
      ├─sda2                  8:2    0     1K  0 part
      └─sda5                  8:5    0 465,3G  0 part
      ├─ubuntu--vg-root   252:0    0 457,4G  0 lvm  /
      └─ubuntu--vg-swap_1 252:1    0   7,9G  0 lvm  [SWAP]
      sdb                     8:16   1  14,6G  0 disk
      └─sdb1                  8:17   1  14,6G  0 part /media/usb
      sr0                    11:0    1  1024M  0 rom
    

    The device path of my usb’s first partition is /dev/sdb1

  • Mount a filesystem (i.e a usb drive, a hard drive…)

      sudo mount </device/path> </mount/point>
    

    Example:

      sudo mkdir /media/usb
      sudo mount /dev/sdb1 /media/usb
    
  • Unmount a file system from a mount point

      umount </mount/point>
    

    Note: This only unmount the file system at the particular mount point, not all mount points that the file system is mounted to

  • Eject a device

      sudo eject </device/path>
    
  • Shutdown and restart

      sudo shutdown -P now # shutdown the machine
      sudo shutdown -r now # restart the machine
    

Tips and tricks

  • Use tree to visualize folder’s structure

      tree <path>
    

    For example:

      $ tree ./
      ./
      ├── docker-compose.yml
      ├── logs
      ├── nginx
      │   └── site.conf
      └── www
          └── index.php
    

    However, tree must be installed first

      sudo apt-get install tree -y
    
  • Use watch to execute a program periodically, then show the out put on the screen.

      watch -n <seconds> <command>
    

    For exampple: watch your memory usage every 5 seconds

      watch -n 5 free -m
    
  • Use htop to monitor your system resource usage

      htop
    

    htop must first be installed

      sudo apt-get install htop
    
  • Use tmux to multiplex your terminal

      sudo apt-get install tmux
    
  • Shorthand command to resume your tmux session when available, else start a new session

      TMUX_ALIAS="tfox"
      TMUX_SESSION_NAME="fox"
      alias "$TMUX_ALIAS"="(tmux has -t $TMUX_SESSION_NAME && tmux attach -t $TMUX_SESSION_NAME) || tmux new -s $TMUX_SESSION_NAME"
    

    Put the above script to your ~/.bashrc, then everytime you want to use tmux, you can just type tfox instead.

  • Connect to your tmux session when doing ssh. Start a new session if not available

      TMUX_SESSION_NAME="fox"
    
      # Automatically start attach tmux session when under ssh
      if [ -n "$SSH_CLIENT" ] || [ -n "$SSH_TTY" ]; then
      if [[ "$TERM" != "screen" ]]; then
          (tmux has -t $TMUX_SESSION_NAME && tmux attach -t $TMUX_SESSION_NAME) || tmux new -s $TMUX_SESSION_NAME;
      fi
      fi
    
  • Add the following command as keyboard shortcut (Fox example, ScrollLock) to toggle fullscreen mode of the currently focused window

      wmctrl -r ":ACTIVE:" -b toggle,fullscreen
    

Using Python in web development with Apache2 and mod_python

Target system: Ubuntu 14.04 LTS Disclaimer: This is not a good practice. The experiment is for learning purpose only

Installing necessary tools and libraries

  1. Installing: apache2 and libapache2-mod-python

     sudo apt-get install apache2 libapache2-mod-python -y
    
  2. Check installation complete by going to http://localhost/
  3. Check if mod python has been enabled by checking the existent of /etc/apache2/mods-enabled/python.load
  4. If the file in step 3 does not exist, add the following line to /etc/apache2/apache2.conf

     LoadModule python_module /usr/lib/apache2/modules/mod_python.so
    

Adding test script

Add index.py to a folder (Let’s say /var/www/html/) with the following content

from mod_python import apache

def handler(request):
    request.content_type = "text/html"
    request.write("Hello World")
    return apache.OK

Adding a server config

Add a file /etc/apache2/sites-enabled/server.conf or modify the default /etc/apache2/sites-enabled/000-default.conf with the following content

<VirtualHost *:80>
    DocumentRoot /var/www/html

    <Directory /var/www/html>
        SetHandler mod_python
        PythonHandler index
        PythonDebug On
    </Directory>
</VirtualHost>

Restart apache server

sudo service apache2 restart

Test

Go to http://localhost/. Press F5 to refresh if necessary. It should show

Hello World

Time travel with git

Scenario:

A thing about using git rebase is that it changes git history, and changing history is always risky (you’re not a Time Lord or a time agent)

Occasionally, you mess up. Running git log gives you a messed up git history, with duplicated and/or missing commits, and multiple merges of the same branch, and blah… blah…

On the bright side, you are using git, and that gives you the power of a time traveler.

Saviors of the day: ‘git reflog’ and ‘git reset’

A good thing about git is that all your committed changes are never truly gone (This is not actually true, though: traceable commits (commits whose children link to a t least one reference) are always …traceable; but orphaned commits will be gone in around 2 weeks by default, and thus, you have around 2 weeks to save your lost work), and can be traced back using git reflog.

This is an example of what produced by git reflog.

07f84b9 HEAD@{0}: checkout: moving from master to demo
41b8897 HEAD@{1}: reset: moving to origin/master
a54fdd2 HEAD@{2}: checkout: moving from demo to master
07f84b9 HEAD@{3}: merge master: Merge made by the 'recursive' strategy.
11b3cff HEAD@{4}: reset: moving to origin/demo
a54fdd2 HEAD@{5}: merge master: Fast-forward
11b3cff HEAD@{6}: checkout: moving from master to demo
a54fdd2 HEAD@{7}: rebase -i (finish): returning to refs/heads/master
a54fdd2 HEAD@{8}: rebase -i (pick): Hotfix: Check for AssetsConfirmed required value
c2a2f45 HEAD@{9}: rebase -i (pick): Move checkEmptyField into a separate javascript utils file
11b3cff HEAD@{10}: rebase -i (start): checkout demo
41b8897 HEAD@{11}: rebase: aborting
11b3cff HEAD@{12}: rebase: checkout demo
41b8897 HEAD@{13}: checkout: moving from demo to master

In the above example, you can see all the actions you have been doing to your git tree, and all the references to all the HEAD’s that you have been on.

For example:

41b8897 HEAD@{1}: reset: moving to origin/master

means that you have called

git reset origin/master

which makes the current working directory points to 41b8897. The hash 41b8897 is what would be used for a git reset (in case you want to reset your current branch to that point of time)

`git reset` changes the current branch's address to another git commit.

For example, I am currently on demo, and want to point demo from wherever to the current origin/master, I can do either

git reset origin/master --hard

or

git reset 41b8897 --hard

Note: specifying --hard forces resetting the content of the current directory to the destination commit, not only the reference of the current branch

Official documentation:

Decorator Pattern

The problem

Let’s start with two problems

  1. The Photo Editor app: Write a simple photo editing application, something like Aviary, or Prisma. The application should be able to:
    • Cropping, rotating photos
    • Adding frames, texts, stickers to the photo
    • Applying various photo filters
  2. The Data Exporter: Write a DataExporter class that fetches data from some sources, then exports the data into a file.
    • The exported data may be in json, or csv format
    • The exported data may be unsorted, or sorted in ascending or descending order of a given attribute.
    • The exported data may be unfiltered, or filtered based on some criteria.

The commonality

Both problems are pretty much similar.

  • In the Photo Editor app problem, you are required to perform multiple changes to a photo: cropping, adding frames, stickers, applying filters…
  • In the Data Exporter app, your are required reconfigure the behavior of the data exporter, and manipulate the data: by setting exported format, applying data filter, sorting data…

Both require making changes to an object, or making changes to the behavior of an object.

A (probably) working (but untested) approach

So here’s an approach to solve the mentioned problems. It’s not tested, though; still, it’s an approach that many people would think of:

  • We need a class representing the object that needs to be changes, or reconfigured
  • We need a class hierarchy that holds the changes to make to the object

The Photo Editor app

  • The Photo Editor app makes changes to a Photo object

      class Photo(object):
          def __init__(self, bitmap):
              self._bitmap = bitmap
    
          def get_bitmap(self):
              return self._bitmap
    
  • And we have the PhotoEditor class that controls the changes

      class PhotoEditor(object):
          def __init__(self):
              self._filters = []
    
          def add_filters(self, *filters):
              self._filters.extend(filters)
    
          def apply(self, photo):
              for filter in self._filters:
                  filter.apply(photo)
    
  • Let’s call the changes that can be made in a Photo Editor app PhotoFilter

      class PhotoFilter(object):
          def __init__(self):
              # To be implemented
              pass
          def apply(self, photo):
              # To be implemented
              pass
    
  • Extend PhotoFilter, and implement the logic of each filter
  • Example usage:

      photo_editor = PhotoEditor()
      photo_editor.add_filters(FramePhotoFilter("simple_frame"),
              TextPhotoFilter("some text", text_coordinates),
              StickerPhotoFilter(sticker_id, sticker_coordinates),
              EmbossEffectPhotoFilter(emboss_level))
      photo_editor.apply(photo)
    

The Data Exporter

  • Firstly, it needs something representing the data

      class Document(object):
          def __init__(self, data):
              self._data = data
              self._format = "json"
    
          def get_data(self):
              return self._data
    
          def set_data(self, data):
              self._data = data
    
          def get_format(self):
              return self._format
    
          def set_format(self, format):
              if format not in ["csv", "json"]
                  raise "Invalid format. Format must be either csv or json"
              self._format = format
    
  • Surely, it needs a DataExporter class

      class DataExporter(object):
          def __init__(self)
              self._formatters = []
    
          def add_formatters(self, *formatters):
              self._formatters.extend(formatters)
    
          def export(self, document, filename):
              for formatter in self._formatters:
                  formatter.apply(document)
              # To be implemented: export the document
    
  • And the DataFormatter class

      class DataFormatter(object):
          def __init__(self):
              # To be implemented
              pass
    
          def apply(self, document):
              # To be implemented
              pass
    
  • Extend DataFormatter and implement the logic
  • Usage example:

      data_exporter = DataExporter()
      data_exporter.add_formatters(ExportFormatDataFormatter("json"),
              SortDataFormatter("created_at", "ascending"),
              FilterDataFormatter(lambda data : data.created_at > a_month_ago))
      data_exporter.export(document, "export.json")
    

Problems?

The solution looks pretty good. We can easily create customized PhotoEditor and DataExporter objects. The PhotoEditor and DataExporter objects are all reusable to multiple photo/data objects. We can have a customized PhotoEditor or a DataExporter object, config it, and reuse it with any provided Photo or Document objects.

The problem here is that the logic of the extra features, and the logic of the targeted object are not transparent. That means, for example, the Photo object knows about the filters that can be, and would be applied to it, and the logic of the filters may get intertwined with the logic of PhotoEditor.

What if we want to make sure that the frames must be added last, after the effect filters? Or what if we want to make sure that only one frame can be added?

When we want to make changes to an object without losing transparency, and thus separating the logic of each added changes, the decorator design pattern comes to place.

What is a decorator?

In simple terms, a decorator is an object that is used to make changes into the behavior of another object, or even a function, method, or class.

In software design, there’s a Decorator pattern. The decorator design pattern allows the behavior of an object to be modified without affecting the behavior of other objects from the same class.
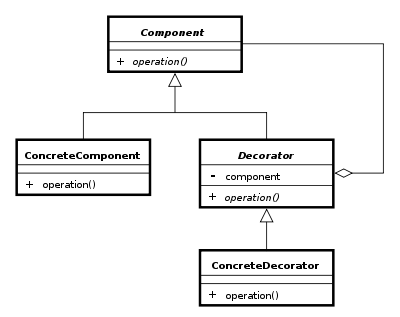
Design

Diagram

Decorator UML Diagram

Example

I am lazy to write multiple examples, so I’ll just go with the Photo Editor app example

class PhotoDecorator(object):
    def draw(self):
        pass

class Photo(PhotoDecorator):
    def __init__(self, bitmap):
        self._bitmap = bitmap

    def draw(self):
        # Draw the bitmap
        # To be implemented
        pass

class AddFrameDecorator(PhotoDecorator):
    def __init__(self, photo_decorator):
        self._photo_decorator = photo_decorator

    def draw(self):
        # Probably some logic
        self._photo_decorator.draw()
        # Or just draw the frame on top of what was drawn
        # To be implemented

# Similarly, implement other filters...

Example code usage:

photo = Photo(bitmap)
photo = AddTextDecorator(photo, text, coordinator)
photo = EmbossEffectPhotoFilter(photo)
photo = AddFrameDecorator(photo)
photo.draw()

Analysis

The Decorator Design Pattern’s solution looks much neater than the one using the collection of filters solution. There isn’t a need for a wrapper class that manages the Photo object, and manipulates the list of filters. We can add as many layers of decoration as we want, and the logic of each decoration never leaks out of its respective class.

Actually, using Python in this example is a bit lame, since there isn’t a need in using inheritance at all.

class Photo(object):
    def __init__(self, bitmap):
        self._bitmap = bitmap

    def draw(self):
        # Draw the bitmap
        # To be implemented
        pass

class AddFrameDecorator(object):
    def __init__(self, photo):
        self._photo = photo

    def draw(self):
        # Probably some logic
        self._photo.draw()
        # Or just draw the frame on top of what was drawn
        # To be implemented

# Similarly, implement other filters...

Python is a duck-typing language, so as long as the self._photo object has the draw() method, it gets called.

Programming in Python is fun and simple. In fact, decorator is actually implemented as a feature in the Python language.

Python decorator

Definition

A Python decorator is a specific change to the Python syntax that allows us to more conveniently alter functions and methods (from Python Wiki).

Syntax

@decorator(kwargs**, args*)
def decorated_function(kwargs**, args*):
    # TODO: To be implemented
    pass

The python decorator syntax alter the behaviour of the function, then bind the function’s name to the new function’s behaviour.

The above code is equivalent to:

def decorated_function(kwargs**, args*):
    # TODO: To be implemented
    pass
decorated_function = decorator(decorated_function)

Writing a Python decorator

A Python decorator is simply a function accepting a function or method as an argument, then returns another function or method with modified behavior. A typical Python decorator can be implemented as followed:

def decorator(func):
    def func_wrapper(**kwargs, *args):
        # Do something before calling `func`
        # We may as well modify kwargs, or args
        result = func(**kwargs, *args)
        # So something after calling `func`
        # We may as well alter the returning value of `func`
        return result
    return func_wrapper

Example

Implement a solution that allowing drawing three types of shapes:

  • A circle
  • A circle with red border
  • A rectangle with red border

Expected result

Circle with normal border
Shape: Circle

Circle of red border
Shape: Circle
Border Color: Red

Rectangle of red border
Shape: Rectangle
Border Color: Red

Solution

def draw_red_shape(draw):
    def wrapper():
        draw()
        print "Border Color: Red"
    return wrapper

def draw_circle():
    print "Shape: Circle"

def draw_rectangle():
    print "Shape: Rectangle"

if __name__ == '__main__':
    print "Circle with normal border"
    draw_circle()
    print

    print "Circle of red border"
    draw_red_shape(draw_circle)()
    print

    print "Rectangle of red border"
    draw_red_shape(draw_rectangle)()